We are going to write a Django project so that we can learn the basic concepts and operations. Our website is a basic poll application, which consist of two parts:
- A pyblic site that lets people view polls and vote in them
- An admin site that lets you add, change, and delete polls.
Create a project
The first thing we need to do is to create a Django project, which is a collection of settings for an instance of Django, including database configuration, Django-specific options and application-specific settings.
From the command line, cd into the directory where you would like to store your project, then run the following command:
django-admin startproject MyWebsite
This will result in a directory in your current directory and the directory structure is like:
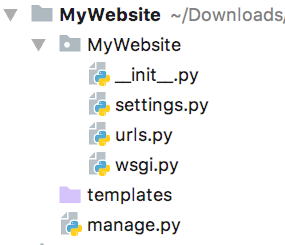
- The outter
MyWebsite/root directory is just a container for our project. It is name doesn’t matter to Django; so you can rename it whenever you want. - The inner
MyWebsite/directory is the actural Python package for our project.MyWebsite/.settings.pyis for configuration for this Django project.MyWebsite/urls.pyis for URL declarations for Django project.MyWebsite/wsgi.pyis an entery-point for WSGI-compatible web servers to serve the project.
manage.pyis a command-line utility that lets you interact with the Django project.
Development server
Once we created the project, we can verify whether it works by running the following command:
python manage.py runserver
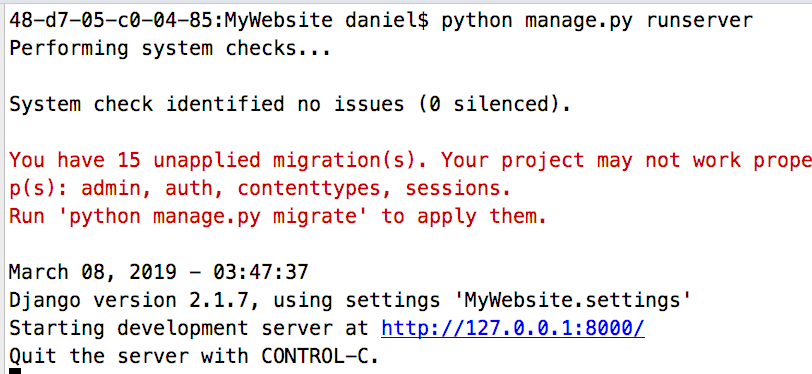
The following output will be on the terminal:
|
|
Then we can visit http://127.0.0.1:8000/ with browser.
By default, the runserver command starts the development server on the internal IP at port 8000. If you want to use another port, you can pass it as a command-line argument.
python manage.py runserver 8080
If you want to change the server’s IP, pass it along with the prot.
python manage.py runserver 0:8080
Create the Polls app
Now that we can create the apps under this project. To be clear, an app is a Web application that does something – e.g., a Weblog system, a database of public records or a simple poll app. A project is a collection of configuration and apps for a particular website. A project can contain multiple apps. An app can be in multiple projects.
To create our app, make sure we are in the same directory as manage.py and type the command:
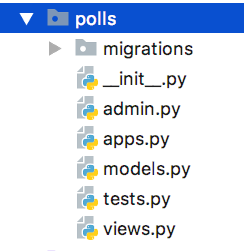
ppython manage.py startapp polls
we will get a directory like this:
Write a view
Open polls/views.py and put the following code in it:
|
|
To call the view, we need to map it to a URL. Therefore we need to create a urls.py and write the codes:
|
|
The next step is to point the root URLconf at the polls.urls module. Open MyWebsite/urls.py:
|
|
Here, the include() function allows referencing other URLconfs. We should always use include() when you include other URL patterns. admin.site.urls is the only exception to this.
Finally, run the command python manage.py runserver and go to http://127.0.0.1:8000/polls/, we should see the text Hello World!, which is defined in the index view.
The path() function takes four arguments, two required: route and view, and two optional:kwargs and name.
path()argument:routerouteis a string that contains a URL pattern. When processing a request, Django starts at the first pattern inurlpatternsand makes its way down the list, comparing the requested URL against each pattern until it finds one that matches.Patterns don’t search GET and POST parameters, or the domain name. For example, in a request to
https://www.example.com/myapp/, the URLconf will look formyapp/. In a request tohttps://www.example.com/myapp/?page=3, the URLconf will also look formyapp/.path()argument:viewWhen Django finds a matching pattern, it calls the specified view function with an
HttpRequestobject as the first argument and any “captured” values from the route as keyword arguments. We’ll give an example of this in a bit.path()argument:kwargsArbitrary keyword arguments can be passed in a dictionary to the target view. We aren’t going to use this feature of Django in the tutorial.
path()argument:nameNaming your URL lets you refer to it unambiguously from elsewhere in Django, especially from within templates. This powerful feature allows you to make global changes to the URL patterns of your project while only touching a single file.
Database setup
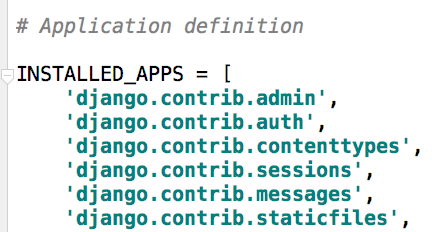
By default, the configuration uses SQLite, which is included in Python and thus we won’t need to install anything else to support your database. Now, open Mywebsite/settings.py.We can see that in INSTALLED_APPS, there are several predefined applications as a convenience of common use.
Note that these applications use at least one database table. Then we need to create tables for them before we use them by running the following command:
python manage.py migrate
The migrate command looks at the INSTALLED_APPS setting and creates any necessary database tables according to the database settings in your mysite/settings.py file .
Create models
A model is the single, definitive source of truth about your data. It contains the essential fields and behaviors of the data you’re storing.
In our poll application, we are going to create two tables: Question and Choice. Question model has two fields: question_text and pub_date. Choice has two fields too: choice_text and votes tally. And each Choice is associated with a Question. Open polls/models.py and put the following codes:
|
|
The code is straightforward. Each model is represented by a class that subclasses django.db.models.Model. Each model has a number of class variables, each of which represents a database field in the model.
Each field is represented by an instance of a Field class – e.g., CharField for character fields and DateTimeField for datetimes. This tells Django what type of data each field holds.
The name of each Field instance (e.g. question_text or pub_date) is the field’s name, in machine-friendly format. You’ll use this value in your Python code, and your database will use it as the column name.
Finally, note a relationship is defined, using ForeignKey. That tells Django each Choice is related to a single Question. Django supports all the common database relationships: many-to-one, many-to-many, and one-to-one.
Activate models
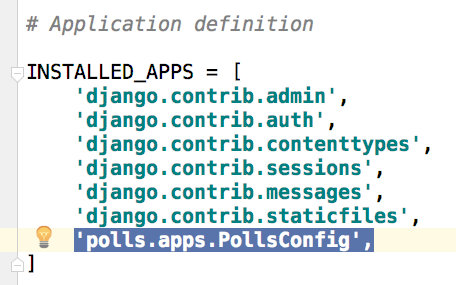
With the above codes, we can create a database schema (CREATE TABLE statements) for this app and create a Python database-access API for accessing Question and Choice objects. But first we need to tell our project that the polls app is installed. Therefore, we need to add models to INSTALLED_APPS setting. The PollsConfig class is in the polls/apps.py file, so its dotted path is 'polls.apps.PollsConfig'. Edit the mysite/settings.py file and add that dotted path to the INSTALLED_APPS setting. It’ll look like this:
Now Django knows to include the polls app. Let’s run another command:
python manage.py makemigrations polls
By running makemigrations, you’re telling Django that you’ve made some changes to your models (in this case, you’ve made new ones) and that you’d like the changes to be stored as a migration.
Now we can run migrate again to create those model table:
python manage.py migrate
The migrate command takes all the migrations that haven’t been applied (Django tracks which ones are applied using a special table in your database called django_migrations) and runs them against your database - essentially, synchronizing the changes you made to your models with the schema in the database.
In summary, there three steps to make model changes:
- Change your model (in models.py)
- Run
python manage.py makemigrationsto create migrations for those changes - Run
python manage.py migrateto apply those changes to the database.
Playing with the API
Now, let’s hop into the interactive Python shell and play around with the free API Django gives you. To invoke the Python shell, use this command:
|
|
Once we are in the shell, explore the database API.
Django Admin
Create an admin user
Firstly, we need to create a user who can login to the admin site. In order to create such user, we can use the command like this:
python manage.py createsuperuser
Then enter username, email address and password:
Username:admin
Email address: admin@example.com
Password:admin123
The Django admin site is activated by default. Let’s start server and explore it:
python manage.py runserver
Now, open a web browser and go to “/admin/“ on your local domain, e.g., http://127.0.0.1:8000/admin/
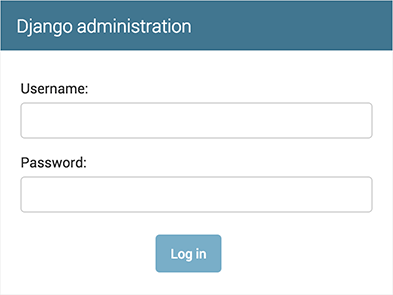
Once you login to the website using username and password, we can see:
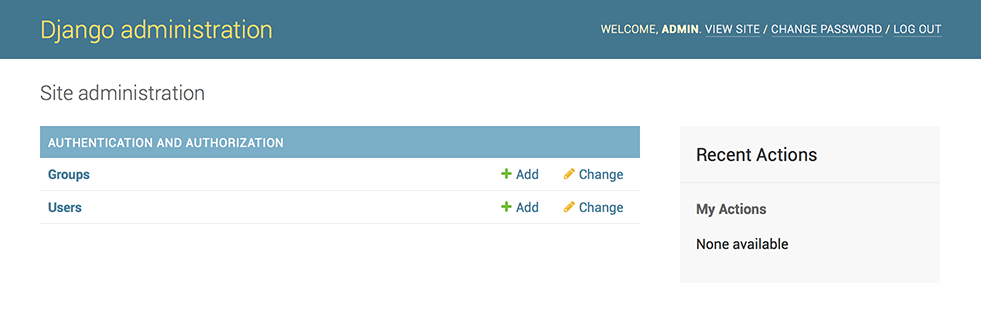 We should see a few types of editable content: groups and users. They are provided by
 django.contrib.auth, the authentication framework shipped by Django.
Make the poll app modifiable in the admin
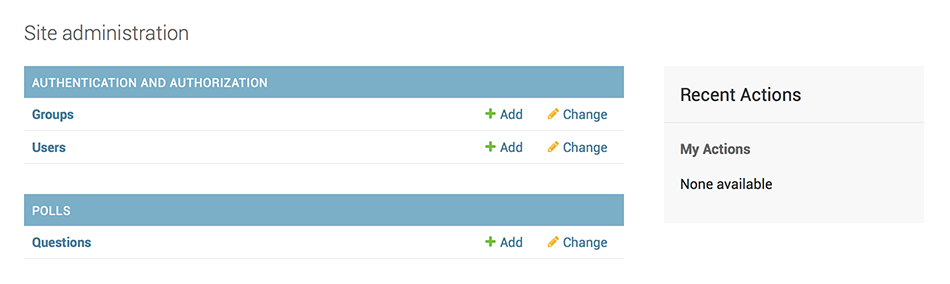
But where’s our poll app? It’s not displayed on the admin index page.
Just one thing to do: we need to tell the admin that Question objects have an admin interface. To do this, open the polls/admin.py file, and edit it to look like this:
|
|
Now that we’ve registered Question, Django knows that it should be displayed on the admin index page:
Day1 Basic Commands
Create a new Django project
1django-admin.py startproject project_nameCreate a new app
1python manage.py startapp app_nameOpen the Django project directory, then execute the command. Usually a Django project can have multiple app.
Run the app
123456python manage.py runserver# use specified portpython manage.py runserver 8001python manage.py runserver 9999# all available ippython manage.py runserver 0.0.0.0:8000Create a database table
12python manage.py makemigrationspython manage.py migrateClear the database
1python manage.py flushImport/Export Data
12python manage.py dumpdata appname > appname.jsonpython manage.py loaddata appname.jsonCreate supermanager
1python manage.py createsuperuser
Day2 View and URL
Here we are going to write a “Hello World!” application to illustrate the relationship between views and urls.
Firstly, use the command to create a project. Of course we can also pycharm to create a project named “MyWebsite”. We can see the project file structures:
Then inside this project, we are going to create an app named “FirstDemo”:
|
|
Then, we have the new structures:
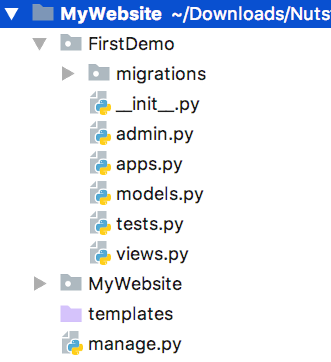
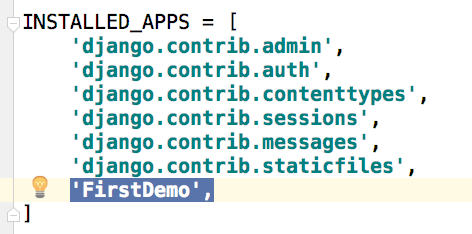
we can find that there is one added directory “FirstDemo”. After creating a new app, we are going to registering this app to the whole project by add this new app to settings.py:
After this, we are going to define a view function. A view function specify what we are going to see when we open the website. Go to “FirstDemo” and open “views.py”:

Here, we define a “HelloWorld” function, whose parameter is request and the first parameter can only be request. A request variable includes get and post infomation. This function use HttpResponse to return information to the webpage, like print in python.
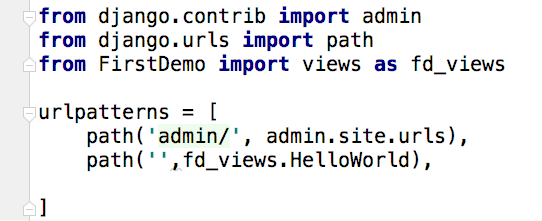
After we define the function of our webpage, but how can be visit it? We are going to define the url that we need to visit the webpage. Open the MyWebsite/MyWebsite/urls.py,we are going to import the view function:
|
|
then we define the url:
|
|
The overall modification is like:
Finally we can run our project:
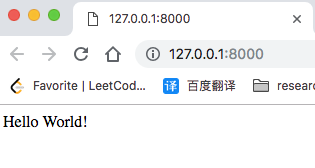
Open the link, we can see:
Day3 Advanced Views and Urls
Last time, we have learned how to display information in django. This time, we are about to implement a little complex function, i.e., addition, and display the addition result.
/add/?a=4&b=5 to visit webpage
Firstly, let’s create a new app named Addition:
|
|
We need to define the addition function in views.py
|
|
Here, request.GET return a dictionary, request.GET['a'] return a value. A better way is request.GET.get('a',0) where a default value 0 is return if a is not defined.
Then we need to modify urls.py:

Finally, we can run our program:
|
|
Here, we set the port 8110. And we can use the following url to visit the webpage:
|
|
But we found that: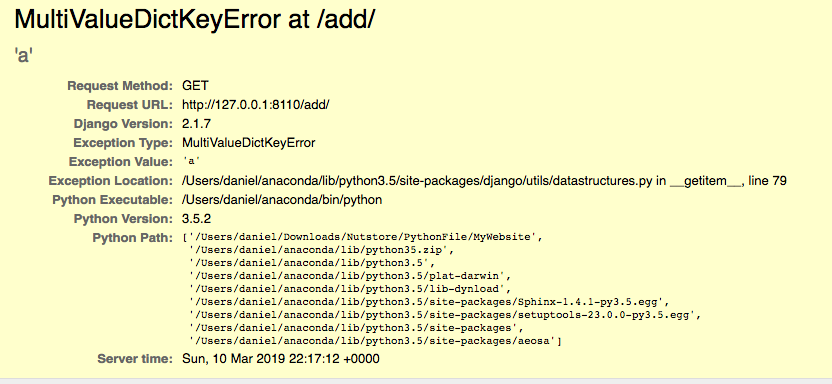
That is because we didn’t give initial value to a and b.
|
|
Using the above url, we can see 9 displayed.
/add/3/4 to visit page
Here we define another add function in views.py
|
|
Then, in urls.py:

Finally we run the program and visit the webpage:
|
|
Reference
Deploying a Keras Deep Learning Model as a Web Application in Python